Home Dividers & Separators
How to Secure a Freestanding Room Divider So It Will Not Tip Over
Keep a freestanding room divider stable by correcting base and hinge issues first, using the right configuration, and adding approved wall or floor anchoring when everyday activity creates a tipping risk.
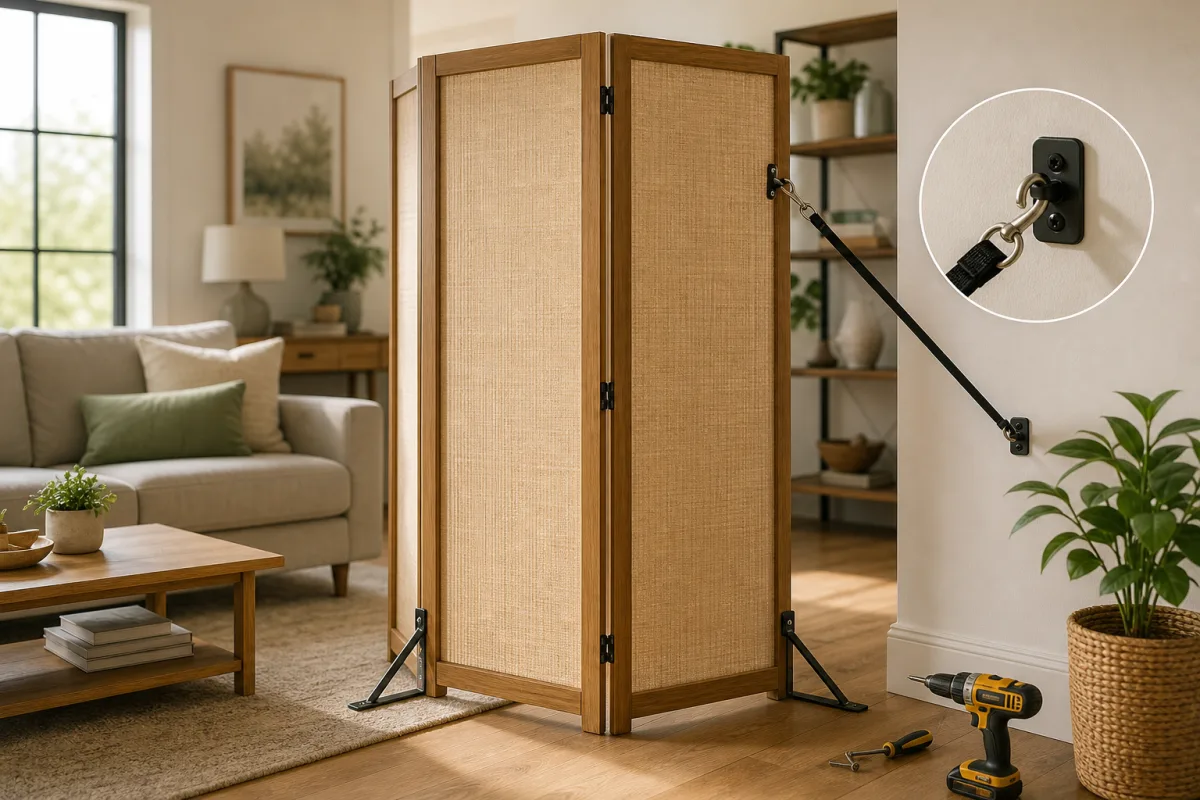
A freestanding room divider can create privacy, separate a work area, or define an open-plan room without a major renovation. Its convenience also means it can be vulnerable to tipping, especially when it is tall, lightweight, narrow, placed on carpet or slick flooring, or exposed to children, pets, doors, and busy foot traffic.
Start by correcting problems with the base, floor contact, and panel configuration. Non-slip pads can reduce sliding, wider compatible feet can improve the base footprint, and wall or floor anchors can address more serious tip-over risks in a fixed installation. The right choice depends on the divider's design, location, and how people use the room.
Avoid improvised fixes that damage the divider, restrict its operation, or create a trip hazard. Always check the manufacturer's assembly, placement, and anchoring instructions before modifying or attaching the divider.
Identify Why the Divider Is Unstable
Before adding straps, weights, or brackets, identify what is causing the movement. A divider can feel unsteady because of the floor, its hardware, its configuration, or its location.
Check for these common problems:
- An uneven floor or a thick, soft rug that lets one side sink or rock
- A narrow base relative to the divider's height
- Loose, bent, or missing feet, hinges, connectors, or fasteners
- Warped panels or a damaged frame
- A folding screen opened too flat, leaving it with a very small footprint
- A tall configuration that exceeds what the divider was designed to support
- Placement near a doorway, hallway, play area, or route used to carry bulky items
Review the manufacturer's instructions for approved hardware, panel arrangements, and designated attachment points. Do not drill into thin decorative panels, glass sections, lightweight trim, or other parts not intended to carry a mounting load.
Choose a Stabilizing Method That Fits the Setup
The best method depends on whether the divider must remain movable, can sit near a wall, or will stay in one place long term. Its construction also matters: a lightweight folding screen needs a different solution from a shelving-style divider with fixed feet.
| Divider setup | Suitable stabilization approach |
|---|---|
| Folding screen that must remain movable | Proper zigzag stance, level placement, non-slip feet, and compatible stabilizer feet if available |
| Single-panel divider with a base | Leveling feet, wider compatible base supports, non-slip pads, or a wall anchor for a fixed location |
| Modular connected panels | Compatible joining hardware to widen the footprint, with wall anchoring when needed |
| Shelving-style or heavy partition | Manufacturer-provided anti-tip hardware and placement on a level floor |
| Semi-permanent divider designed for mounting | Approved wall brackets or floor-mounting hardware installed with suitable fasteners |
A stabilizing method should work with the divider's intended design. For example, a folding screen needs room for its panels to articulate. A wall strap placed across a folding joint may pinch panels, damage hinges, or prevent the screen from opening correctly.
Improve Stability at the Base First
Base stability is the first priority because it can address rocking and sliding without necessarily making the divider permanent.
Start With a Level Surface
Move the divider to a level section of floor. If it has adjustable leveling feet, use them as directed so all feet contact the floor firmly. A divider that rocks even slightly is more likely to shift or tip after a small bump.
Avoid placing a narrow-base divider across uneven transitions between flooring types. Thick carpet, loose rugs, and uneven pads can also reduce stability. If the divider must sit on a rug, make sure its feet are supported consistently rather than partly on and partly off the rug.
Add Grip Without Raising the Divider Too Much
Non-slip pads or grippy furniture feet can help prevent sliding on hardwood, tile, laminate, and other smooth surfaces. Choose pads sized for the feet and suitable for the floor finish. They should sit flat, stay attached, and not noticeably raise one side higher than the other.
Grip pads reduce sliding, but they do not substantially widen a narrow footprint or prevent a tall divider from falling when pushed.
Use Compatible Wider Feet or Base Extensions
Some dividers accept purpose-made stabilizer feet, base extensions, or brackets. These accessories can widen the footprint and improve resistance to tipping without significantly changing the divider's appearance.
Use only accessories that fit the divider's frame or designated mounting points. A loosely attached add-on can shift under load and make the setup less safe. Position extensions so they do not intrude into a walkway or create a toe-catching hazard.
Use Weight Only When It Can Be Secured
Adding low, discreet weight may help with some designs, but loose objects are not a dependable solution. Do not place free weights, books, planters, or décor against a divider where they can shift, be moved, or become an obstacle.
If the manufacturer provides a ballast option or the divider has an enclosed base designed to hold weight, follow those instructions. Added weight should remain secured, stay low, and not interfere with folding panels or normal access.
Set Up Folding Screens for a Stable Stance
A folding room divider is generally most stable when its panels form a zigzag or shallow accordion shape. Angled panels create a broader self-supporting footprint than panels left nearly flat in a straight line.
Open the screen within its intended operating range and spread the panels enough to create stable floor contact. The correct angle varies by screen design, but avoid a long, nearly flat arrangement that can easily fold or topple sideways.
Inspect Hinges and Connectors
Loose hinges can allow a folding screen to collapse unexpectedly or sit at an unstable angle. Inspect hinges, pins, screws, and connectors periodically. Tighten accessible fasteners if the design permits, and replace damaged hardware with compatible parts.
Do not force warped panels into position or rely on tape, string, or temporary ties instead of functioning hinges. A screen with cracked panels, damaged hinge mounts, or missing connectors may need repair or replacement.
Keep Lightweight Screens Out of Active Routes
Even properly positioned folding screens are not barriers. Avoid using one in an active doorway, at the end of a hallway, or where people frequently pass while carrying laundry, groceries, or other large items.
For exceptionally lightweight panels, also avoid locations with direct, sustained airflow that repeatedly moves the divider.
Anchor the Divider to a Wall for a Fixed Location
If the divider will stay in one position and could be regularly bumped, pulled, or climbed, wall anchoring is often the most reliable option. Use the divider's approved anti-tip hardware, straps, or brackets whenever available.
Attach hardware only to a structurally sound part of the divider, such as a reinforced upper frame or designated anchoring point. Avoid thin panels, decorative caps, removable shelves, and folding hinge areas unless the instructions specifically permit attachment there.
Do not anchor a folding or movable divider unless its instructions identify an approved attachment point and the installed configuration is intended to remain fixed. Anchoring may limit portability and prevent the divider from folding as designed.
Match Fasteners to the Wall
Locate suitable wall framing where possible. If framing is not available, use anchors rated for the wall material and the planned load. Appropriate hardware differs for drywall, masonry, plaster, and other wall constructions.
Follow the hardware instructions for mounting height, fastener type, and installation method. A wall attachment is only as reliable as the wall material and installation behind it.
Keep the Attachment Clear of Moving Parts
For an adjustable divider that is approved for anchoring, place straps and brackets where they will not pinch panels, obstruct access, or catch clothing and bags. The divider should remain in its intended stable configuration after installation.
Check that straps are taut enough to limit excessive movement without placing unnecessary strain on the divider or wall attachment.
Secure Floor-Mounted or Semi-Permanent Dividers Carefully
Floor brackets and mounting plates can provide strong support, but use them only on dividers designed for floor installation. A decorative screen or lightweight movable divider may not have a frame capable of handling floor-mounted loads.
Before drilling, confirm what is beneath the finished flooring. Floors may contain utilities, radiant-heating components, underlayment systems, or other features that should not be penetrated. Use fasteners appropriate for the finished floor and the subfloor or structural material below it.
If you cannot confirm the floor construction, identify safe fastening points, or rule out concealed services, hire a qualified installer rather than drilling.
Position brackets and plates where they are less likely to interfere with walking paths. Exposed hardware near a doorway or passage can become a trip hazard even when the divider itself is secure.
If you rent or cannot alter the floor, use a wider compatible base, non-slip feet, or a stable connected-panel arrangement. Use wall anchoring only where permitted and appropriate for the divider. Do not treat adhesive products as a substitute for structural mounting unless they are specifically rated for the divider and surface.
Use Connected Panels, Not Improvised Braces
Nearby furniture is not an anti-tip device. Do not use chairs, tables, cabinets, or other furniture to pin, wedge, or structurally brace a divider unless the divider manufacturer specifically designs the system for that arrangement.
For modular systems, use compatible joining hardware to connect panels into a wider arrangement. A broader configuration can distribute weight and improve resistance to side-to-side movement.
Avoid these makeshift supports:
- Unsecured chairs, small tables, or rolling furniture
- Stacked books, boxes, or storage bins
- Fragile décor, planters, or lamps
- Items leaning against one side of the divider
- Heavy objects that block exits or create a tripping hazard
If a divider is likely to be pulled or climbed, use an approved anchor or select a different divider design rather than relying on adjacent furniture.
Account for Children, Pets, and Everyday Use
A divider that seems stable in a quiet room may not stay stable in daily use. Children may pull, climb, or lean on it. Pets can run into it, push through it, or catch a leash or toy on its edges. Adults may bump it while vacuuming, opening a door, or carrying an item through the room.
Place the divider away from:
- Climbing opportunities, including beds, sofas, low cabinets, and play equipment
- Play zones and high-energy pet areas
- Swinging doors and door handles
- Routes used for moving large items
Keep cords, bags, scarves, and hanging decorations off the divider. They can encourage pulling or snag as someone walks by.
When a divider receives regular contact, choose a stronger solution: a wall-anchored unit, a properly mounted partition, or a lower, wider, heavier divider intended for the setting. Check feet, hinges, anchors, and fasteners periodically for loosening, wear, or damage.
Know When to Replace or Reconfigure the Divider
Not every divider can be made safe in every location. Replace damaged panels, cracked bases, bent hardware, stripped screw holes, or failed attachment points rather than relying on an uncertain repair.
Choose a different product if the current divider remains unstable after proper setup and approved stabilization measures. A lower, wider, heavier model or a purpose-built anchored partition may be better suited to a busy household or permanent room-zoning need.
Reassess the installation after changes such as:
- Moving the divider to a new room
- Rearranging nearby furniture
- Installing new flooring or rugs
- Changing the panel configuration
- Adding a pet or creating a children's play area
Use a Simple Safety Decision Framework
To secure a freestanding room divider, start with the basics: place it on a level surface, create the widest stable base the design allows, and reduce sliding with appropriate non-slip feet or pads. Set folding screens in a stable zigzag stance, and repair loose hinges or damaged components before relying on the divider.
When the divider remains in one spot or faces realistic tipping risks from traffic, children, pets, doors, or frequent contact, use approved wall or floor anchoring suited to both the divider and the building surface. The safest setup matches the divider's design, keeps walkways clear, and is checked as the room and household needs change.